How to make round steps on a porch. How to make a semicircular concrete porch with your own hands? Features of a semicircular porch and drawing up a drawing
Making semicircular steps for a porch with your own hands requires calculating the depth, length and height of the steps. The choice of material for their cladding affects the ease of movement around the porch. But the smooth lines of the porch look so attractive and harmonious! At the end of the article there is a thematic video on this topic, see for yourself.
Foundation

The process of constructing semicircular steps for the porch involves arranging the foundation:
- The space for the foundation is being cleared.
- A 20-centimeter pit is dug. The pit is filled with crushed stone to the middle of the level.
- The remaining space is filled with cement mortar.
- Formwork is being constructed for the round steps of the porch, where the board thickness is at least 2 cm.
You can clearly see the process in the photo. Types of cladding of concrete flights: stone, pebbles, wood, brick, marble, ceramic tiles - the most popular.
Calculations
Calculation of steps for a do-it-yourself porch involves determining the height corresponding to the base of the foundation (the segment from the door threshold to the ground). 3 cm is subtracted from the upper level. This is due to the swelling of the door during high humidity(especially wooden ones). Next, set the angle of the porch.

According to SNiP regulations, the slope of the flight of an individual building should not exceed 45-50 degrees. A convenient option would be round steps of 22-37 degrees.
Dimensions
Optimal size: 300 mm deep and 170 mm high (min=100). Width - 700 mm. The smallest number of steps is 2.
How is the data calculated?
Let’s say the height of the steps is 50 cm, the slope is 30 degrees, and the string size is C=B/sinB=50/sin30=50/0.5=100 cm. A three-stage porch assumes a string length of = 33 cm.
Materials and equipment

When thinking about the question of how to make semicircular steps at the porch with your own hands, you need to stock up on important components of the process:
- facing material;
- crushed stone or gravel;
- concrete mixture 1 x 4;
- board 20 cm wide;
- wooden beam 10 cm wide.
Tools: shovels, pick, chisel, hammer, level, measuring tool.
Tile for stairs and its features
Facing semicircular steps with ceramic tiles will be more successful if you first decide on the purchase of materials. Due to the constant load on the product, the influence of aggressive environments, ultraviolet radiation and unstable temperature conditions on it, the choice of finish must be approached taking into account practicality and reliability.
We must not forget about safety. The use of a glossy coating with a sliding effect is excluded. A reasonable solution would be to purchase matte decorated products or clinker cladding for steps. The latter option includes clay content and sealing ingredients that promote high resistance and durability.

How to lay tiles for steps with your own hands: simple recommendations
There is a video on the topic “how to make semicircular steps” at the end of the article. Below are instructions for installing a porch with your own hands:
After the formwork is erected, the concrete is filled to the level of the cladding. Laying the tiles occurs after the mortar has dried. Using a building level, the evenness of the surface of the steps is determined: horizontally and vertically. If you plan to lay out the lining of the round steps of a wooden staircase, it is important to use a spacer partition that is attached to all structural elements. Afterwards, work is carried out on tightness.
Next, you need to take measurements of the entire surface of the porch, make an accurate calculation and go to the store. Semicircular tile steps require the purchase of related building materials: decorative tiles, dry building mixture, tools for laying tiles (trowel, trowel), glue, etc.
Masonry ceramic tiles with your own hands in a semicircle is carried out from top to bottom. After installation, it is not allowed to step on the structure for 24-48 hours.
4 ways to cut tiles

At the very beginning of the process, the question will arise: how to cut tiles in a semicircle?
There are several ways to cut tiles for a round porch yourself.
- Tile cutter is the most popular method (photo below, as well as photo on the right).
- You can cut the tiles yourself using nippers. But in this way it is not always possible to set the exact shape and chips are possible. With this treatment, the edges of the product must be smoothed by grinding.
- A ballerina is also suitable for cutting artificial marble. However, it is more often used for metal.
- You can cut slabs into shapes using a grinder with a stone disc. It creates unevenness and working in this way is more labor-intensive. But in terms of ease of use, it beats electric tile cutters.
How to cut tiles without a tile cutter?
Before this mandatory step, soak the slabs for an hour. This will increase its adhesion to the wall.
Experts most often recommend using a glass cutter. But for cutting ceramic or clay products, it is possible to use a homemade cutter with carbide tips, a hardened metal scriber, or just a nail. The metal element is passed several times to form a groove. After this, the tiles are broken. Such cutting is quite labor-intensive and is appropriate for minor repairs and lack of professional tool.

Creating a semicircular staircase
- Clean cracks, depressions and irregularities using thick mortar or primer.
- Apply the sheathing to the wood decking of the porch. It is important to spread the glue with a notched trowel before doing this.
- Experienced craftsmen prefer to glue the tiles onto the spacer.
- Insulate seams and joints from penetration of moisture and dirt.
You need to apply a small amount of mortar at a time, as it dries quickly.

Tiling the stairs
The round steps of the porch shown in the photo were faced by applying an adhesive composition to the surface. Excess was removed using a spatula. Clay tiles were laid on top.

The success of creating the semicircular steps shown in the photo was influenced by the following factors:

- A high-quality base, impeccably level.
- The correct consistency of the glue solution allows you to make a thin and even layer.
- Using separators (crosses).
- Products were checked for size compliance and absence of defects.
- The cutting was carried out with a special device.
A day after installation, it is necessary to cover the joints of the ceramic panels with grout of a suitable shade.
The entrance of the house is its face. It can set the guest up for a pleasant welcome or, conversely, make him wary. Most entrances are made with a rectangular or square porch, but a round concrete porch looks more impressive. Filling it requires some ingenuity, since achieving the ideal shape can be difficult. If there are several steps to be made, then the work becomes much more complicated, but remains within the control of even an inexperienced master. The article will discuss ways to give a specific shape to the porch, as well as the requirements for the concrete mixture.
Design Process
Drawing up a drawing of a semicircular porch is also done with your own hands. To do this, you need to take a blank sheet of paper, preferably in a square, and make some measurements that will be transferred to the plan. When designing, it is necessary to start not from the lower part of the porch, but from the upper part, which will be located near front door. At a minimum, two adults should comfortably fit next to it. To achieve this, the width of the porch near the entrance should be at least 50 cm larger on each side of the edge of the doorway. Now you need to measure the total width of the site. Using a compass at the selected scale, the drawing is transferred to a piece of paper. First, the front door is schematically depicted. A semicircle is drawn from the central point of the door with the dimensions specified on the scale. An example can be seen in the photo below.
If there are several porch steps, then it is necessary to measure the height from the ground level to the threshold of the front door. The resulting size will need to be divided by the height of one porch step. It can be 16 cm. If the number is obtained with a remainder, then you can make an additional small step or evenly divide the remainder between all steps. The width of the step should be such that it is easy to stand on. Usually 25 cm is enough for this, but the size can be increased to 30 cm. Knowing this data, you can add it to the drawing. The next step of the porch is depicted by another semicircle, which is drawn to scale. The drawing requires all dimensions that must be observed during installation.
Note! The angle of the porch should not exceed 45°. In this case, it can be called safe. If according to the drawing the angle is larger, then you can increase the width of the steps. This will also reduce the strain when lifting.
Calculation of required materials

After making the drawing, you can begin to calculate the amount of material required. To do this, you need to calculate the volume of the porch. To simplify the process, you can divide the porch into separate figures, the volume of which will subsequently be folded. Since this is a non-rectangular porch, then it is necessary to calculate the volume of the half-cylinders, each of which is a separate step. The volume of the cylinder is calculated using the formula V=πr 2 h. Let's assume that the upper platform is 2 meters wide. This value corresponds to the diameter of the circle, which means the radius will be half smaller, i.e. 1 meter. The height of the step is 16 cm. Now you can substitute all the values into the formula and get 3.14 × 1 × 0.16 = 0.5 m 3. But it is worth remembering that the site is a semicircle, so the result must be divided by 2 and the result will be 0.25 m 3. Each step is calculated in a similar way. At the end, all volumes are added up and the total value is obtained.

Next, you need to assume that it takes 320 kg of M400 cement to prepare one cube of concrete mixture. Knowing that the solution is prepared in a ratio of 1 to 3 to 5, you can calculate that approximately 1000 kg of sand and 1600 kg of crushed stone will be needed. If you build a semicircular porch with your own hands with the dimensions given above and three steps, then its total volume will be 1.2 m3. This means that it will require a total of 384 kg of cement, 1200 kg of sand and 1920 kg of crushed stone. These figures were obtained by multiplying the volume of the porch by the required amount of materials. It is worth considering that concrete mortar will also be needed for the foundation.
Preparatory stage
The preparatory stage is one of the most important when building a semicircular porch with your own hands. The area is thoroughly cleaned of various debris and plant debris. It is necessary to remove the top layer of turf to make marking easier. It will be more convenient to work on a flat area, so it can be partially leveled using the rule. After preparation, you can begin marking. The size of the lower step is already known; in order to draw a semicircle of the required size, you need to take a strong rope, the length of which will be equal to the radius of the lower circle. The rope is fixed at a point that will correspond to the middle of the door. A piece of reinforcement or a small wooden block is tied to the opposite end of the rope. With the help of such a simple device, a semicircle is drawn from wall to wall. It will mark not only the bottom step, but also the foundation of the entire structure, as in the photo below.

The entrance will be quite heavy, so it needs good support. A pit is dug with a width of 30 cm. It is necessary to go deeper to a depth of at least 70 cm. The best solution the foundation for the porch will be built to a depth below freezing of the soil. The bottom of the resulting pit is filled with crushed stone 10 cm thick. It is leveled and the same layer of sand is laid. The sand must be well compacted and leveled. Additionally, it can be moistened so that the load is subsequently well distributed throughout the material. For better waterproofing of the structure, roofing felt can be laid on the bottom and walls. A mesh is made from metal reinforcement and placed in the pit. In this case, it must be raised slightly by placing it on supports. This is necessary so that the solution ends up at the bottom of the structure; the photo shows an example.

The porch foundation is poured to ground level. In this case, it is necessary to ensure its connection with the foundation of the building. For these purposes, holes are drilled in the foundation into which studs or metal reinforcement are inserted. After pouring concrete with your own hands, you need to make sure that it fills the voids and that air bubbles come out of it, which can cause voids to form. For these purposes, a deep vibrator or pieces of reinforcement are perfect, which need to be used to methodically pierce the thickness of the solution. Additionally, you can insert reinforcement around the perimeter of the foundation for the porch, which will protrude above its level. This is necessary for dressing with steps. Strengthening will occur over several weeks. At this time it is advisable to cover the base waterproofing material, as shown in the photo, which will prevent the rapid evaporation of moisture. A video on how to bend the reinforcement is below.
How to build formwork

Formwork in the case of a semicircular porch has some nuances during construction. It will not be enough to simply knock down the shields that will prevent the solution from leaking out. They must be of the required shape for the porch. For these purposes you can use:
- board or plywood;
- galvanized metal;
- plastic sheets.
If the radius is small, you can try using a regular board with a small thickness or plywood. The elements must first be soaked in water. As moisture increases, they will become more elastic. After this, the boards are bent to the required diameter and clamped in this state until dry. After drying, they will retain the shape of the future porch. But to carry out such an operation when building a porch with your own hands, you need to spend a lot of effort. Therefore, it will be easier to use galvanized metal. This material bends well, so it will not be difficult to give it the required shape. Less commonly used plastic panels linings. Plastic can withstand the low weight of the solution, so it is suitable for small porches.

Formwork can be made for all steps at once or gradually constructed for each step separately. In any case, you will need a wooden frame that will hold the sheets. They can be screwed to the bars with ordinary self-tapping screws. It will be necessary to install transverse struts that will keep the shape of the porch steps within the required limits.
Installation process
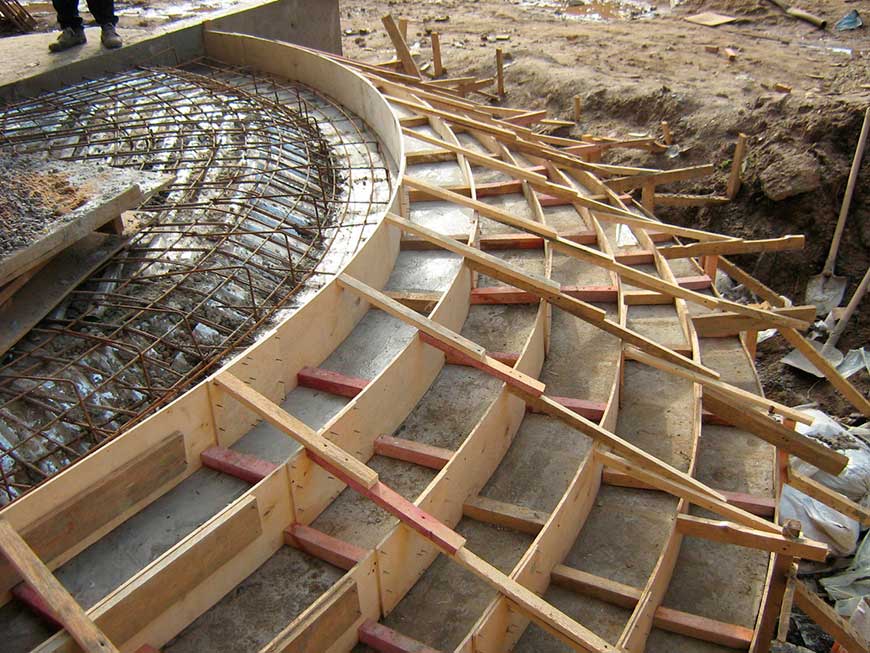
A metal sheathing is installed inside the prepared formwork for the porch, as in the photo. In this case, the reinforcement rods must be bent along the radius of the steps. All grids that will be laid in the steps of the porch must also be connected to each other. This will ultimately create a strong monolithic structure. By tying the base of the porch to the foundation of the building, cracks will not appear during shrinkage. After installing the metal porch grating, you can begin pouring the concrete. Its proportions were discussed above. It is better if the filling occurs at one time. But sometimes this seems impossible, so the process has to be carried out in several passes. It is for such cases that bandaging all the elements of the metal base will be good.
Advice! In the case where the filling will be done gradually, the reinforcement can be laid in conjunction with the installation of formwork. But it is imperative to ensure binding with the previous step. For these purposes, you can leave protruding reinforcement in it, which will be part of the new fill. You need to take care of a freshly poured porch in the same way as you would a foundation.
What to do with the cladding

After several weeks or a month, when the porch has gained full strength, you need to start finishing it with your own hands. Concrete is certainly a durable material, but it needs additional protection. This is due to its porous structure. Because of this, moisture will constantly get inside the porch, which over time will destroy the metal reinforcement, which will lead to chipping of parts of the porch. Therefore, the pores must be closed and the porch will retain its appearance longer. This can be done with your own hands, for example, using porcelain tiles. It has high strength and resistance to mechanical stress, so constant loads from people's feet will not lead to wear. Thanks to minimal pores, such tiles will provide excellent waterproofing to the base of the porch.

Note! Tiles for cladding the porch must be selected with a rough surface. This will make it possible to prevent falls during rain and snow.
Another excellent option for cladding the porch would be clinker tiles. An example can be seen in the photo. It is made from a special type of clay using the sintering method. At the same time, there are practically no pores in it, which also minimizes the amount of moisture that can seep to the base of the porch. The color scheme of such tiles will match any home exterior. It is not advisable to use paving slabs for finishing the porch. This is really the most affordable option, but it will also provide minimal protection, since such tiles also allow moisture to pass through perfectly. When laying tiles with your own hands, you need to consult with a professional in your field, since laying on the rounded base of the porch requires a certain skill.

Note! If you want to have handrails for the porch, the foundation for them must be laid during pouring, so that later you do not have to drill large-diameter holes for installing pipes.
Conclusion
The construction of a semicircular porch will require significant investment of money and effort. But the result will please the eye for a long time. Over such a porch you can build a canopy made of polycarbonate and metal. You can make a forged canopy over the porch. An excellent solution would be to build a canopy over the porch that will cover the steps. This will prevent them from freezing in winter.
How to make semicircular steps from wood, what material is better to choose? Wooden steps in private homes are a common occurrence. You can make them yourself. Since standard designs are too boring, you can change the shape of the steps and choose different materials.
How to choose material
How long your porch steps will last depends on the quality of the wood, so start by carefully checking all types of raw materials. The material can be anything, but it must meet a number of parameters.
First of all, be dry. There are several techniques that will let you know that the wood has dried well. Drop iodine onto the lumber; if this place turns blue, then there is excess moisture in the wood.
Pay attention to the edges of the cuts. High-quality lumber is characterized by straight lines and clean cuts. Damp wood will absorb dirt. When cutting dry material, the cuts remain clean.
Guided by these rules, select timber for the construction of porch posts and boards for steps. Remember that high-quality wood should not have knots. Under load, they will definitely fall out, and the steps will lose their strength. Do not buy lumber that has visible signs of damage - rot and mold.
You should not make steps from soft hardwood. For building a porch with your own hands, pine or larch are best suited. The latter option can easily be called ideal, but it is worth considering that larch is not easy to process on your own and is quite expensive.
The cross-section of the porch rack depends on the type of porch, as well as on the expected loads. For construction, the choice of timber with a cross-section of 150 mm is considered optimal. In addition, it is necessary to take into account the number of steps and the presence of a canopy. It must be done, otherwise the flow of rainwater can lead the stairs to a deplorable state.
Which design to choose
Since there are so many options for semicircular degrees, you can choose any one you like. One porch may have monolithic steps, while the construction of another involves the construction of a multi-tiered structure.
There is a wooden platform different types. Most often it is made in a square or rectangular shape, or you may not build it at all. Nevertheless, any project involves developing a drawing, specifying exact dimensions and calculating permissible loads.
The number of steps without handrails can be up to 5 pcs. A larger number requires the mandatory installation of railings. The width of the steps for the porch should be at least 30 cm; this is the most convenient option. You can look at the SNiP standards and do everything in accordance with the standard.
Determine the height of the riser; it is better to stop at 18 cm. There is no need to go higher, as this will interfere with the comfortable movement of elderly people or disabled people.
The length of the porch posts will depend on the type of structure. If you decide to make both a canopy and handrails, then take all measurements in advance. The fact is that the racks must be embedded in concrete mortar at an early stage of construction.
Make a drawing in advance, use the actual dimensions that you took earlier. This way, the construction of the porch will go faster, and novice builders will more easily master the technology. The design will look like this:
- you will have a set of racks, they are of different heights;
- the racks form several semicircles;
- the upper tier will be the landing.
What to pay attention to
If you do wooden stairs in front of the house, first remove the soil from the area to the desired depth. Dig a hole where future pillars will be installed and be sure to waterproof them. Level the area, add gravel and sand. Do the same with the pits.
Install the formwork and make supports. They are needed so that the concrete mass cannot break wooden boards formwork. Use reinforcement to strengthen the frame. Cover the ends of the posts with roofing felt and lower them into the prepared pits.
The use of mastic in this case is undesirable, because it will clog the pores of the wood.
This video talks about making a wooden porch:
Because of this, the timber may begin to rot. Pour the solution into the formwork, the concrete will form a reliable foundation. Leave to dry for 3 weeks. After this, lay the steps according to the chosen technology.
Conclusion
Making steps from wood is easy. Use high-quality lumber, then the structure will serve you for a very long time.
The fashion for non-standard architectural forms is returning. And every home owner wants to give his mansion unusualness and originality. This can be done by building a porch. This architectural element will add elegance to the entrance group of the house, enliven the overall appearance of the building, and also serve as protection from snow and rain.
But what type of extension should you choose so that it fits harmoniously into the exterior of the mansion? We will look at what size, shape, configuration, type and style a porch can be in this article. And the most worthy porch options country house Photos from our gallery will be demonstrated clearly.


The design and purpose of the porch
The veranda for the home has become such a common household item that few people think about its role. The main purpose of the extension is to make visiting the home more comfortable for a person.
Since the porch is the center of the building’s facade, it needs to be made as attractive as possible. It is often erected after the construction of the house, so care should be taken to ensure that it matches the style of the mansion. For this purpose, a project for the porch of a country house is being drawn up.
On a note: The more harmonious the overall picture is, the more worthy the veranda itself will look.
Photo of the front porch of a private house - classic design
Types of extensions
Modern types of porches for the home are elegant and comfortable structures, built from modern building materials, which decorate the entrance to the home, making it original and functional. Extensions can be classified into several categories.
Size
The first thing to consider when drawing up a porch project for country and village houses, cottages, small dachas- their size. It is determined by the dimensions of the mansion, as well as building regulations (minimum width is 150 cm, length - 180 cm). For small house a small porch of a simple configuration that matches it in style and proportions is suitable.

Small extension with neat semicircular steps
A medium-sized concrete structure will fit a standard house. Its height is selected individually, based on the dimensions of the mansion.

Openwork metal forged porch
A luxurious mansion has a large porch. It can be low (with a staircase of only 1-3 steps) and located along the entire length of the wall of the house.

A large terrace for a wooden house is a great place to relax
Advice: Having calculated the optimal dimensions of the extension, they are included in the construction plan.If the building is located on uneven terrain, for a convenient approach to it, a porch of the house with a high base is built. Since the platform is located at a certain height, a staircase with a large number of steps should lead to it, equipped with railings for safe walking along it.

High entrance porch of a private house, photo
On a high porch, rounded columns will not be out of place. These will serve as supports to support the canopy over the outer door.
Advice: using design techniques, columns can be turned into decorative elements, decorating the front entrance of the house, giving it style and respectability.
High front porch made of concrete with columns
Form
If we evaluate this design from an aesthetic point of view, then it is almost impossible to find two identical porches. Today you can find verandas of various shapes:
- rectangular;
- square;
- trapezoidal;
- semicircular;
- round;
- asymmetrical.

Rectangular and square views of the porch of a private house, photo
The semicircular porch looks unusual and unique. With this simple technique, a mansion can be made more original. The photo below shows a semicircular porch to a brick house.
On a note: It is not at all necessary that the entire structure has the shape of a circle - a rounded canopy or steps with rounded edges is enough.
Add spice to the architecture of the cottage by adding a semicircular porch, photo
A non-standard solution would also be a corner design. A round porch located on the corner of a rectangular house looks very impressive.

The side circular design accentuates the building's exterior
A corner street extension can be not only round, but also trapezoidal or triangular in shape. The complex geometry of the structure should not be dissonant with the main structure, but create a single concept with it.

An example of an original corner porch of a private house, photo
Placement in relation to the house
Porches can be located differently in relation to the mansion. This way you can build an attached structure - a horizontal platform with steps located in front of the entrance to the house.

Attached design for a summer house with a semicircular canopy
The built-in porch, which has a common roof with the house, looks elegant. Such a combined extension should create a single architectural ensemble with the mansion and the adjacent plot.

Cozy internal veranda can be used as a place to relax
Materials
When developing a porch design, you can choose any materials that match the style of the house, from traditional (wood and natural stone) to more modern (concrete, metal, brick).


Type
In construction, there are several structural types of porches. An open structure is an extension with a small platform, not equipped with a canopy or railings. This design is used in places that are used mainly in the summer (for example, in the country).
Advice: Open-type structures should not be built in areas where precipitation occurs frequently.
Open porch with semicircular granite steps
A structure equipped with a roof or canopy is a covered structure. It has no walls, only railings that protect the extension from the street.

Outdoor covered structure
A structure with walls or glass panels and a canopy is called enclosed. The room is a full-fledged veranda, can have lighting and heating and be used as a gazebo.

Original glass enclosed porch of a brick house, photo
A type of closed extension is a porch with a vestibule. This is a small-area design that provides a comfortable microclimate in the home.
On a note: vestibule - a transition zone on the border with the street, protecting housing from the cold.
Photo of a closed porch to a house like a vestibule
A popular type of extension is a porch-veranda. It is a place for leisure and recreation, and can be closed or open.

Enclosed polycarbonate porch - modern design
A harmonious addition to a cottage made of natural wood would be wooden veranda. And if the extension is closed, it will only improve the thermal insulation of the mansion.

Small enclosed porch wooden house, photo
If the mansion has more than one floor, then you can connect the porch to the balcony. In this case, the connecting element can be columns. In the same way, you can combine the platform with a bay window - the protruding part of the second floor.

Porch with bay window under the balcony
A spacious porch-terrace can be used as a place to relax. The large area can accommodate a table, chairs and even sun loungers.

An open terrace with a porch is located under a common roof with the house
An option for a non-traditional design design is a mini gazebo on the terrace. With the help of plants and comfortable furniture, the structure can be made more comfortable.

Round porch-gazebo
Extensions may differ not only in purpose and design, but also in the design of the staircase. A staircase with one flight is considered standard, but there are other varieties.

Staircase with flight on two sides
Exit to the site can even be organized from three sides, and the staircase itself can be semicircular or complex geometric in shape.
Note: the canopy and railings not only perform practical functions, but also serve as elements of decoration and design of the entrance group of the mansion.
Beautiful staircase built in a semicircle
Stylistics
In order for the extension to harmonize with the house, it is better to think through its design in advance. Thus, a stone structure can be designed in the style of a medieval fortress. To design it can be used facing stone, forging.

Play with contrasts - decorate the stone structure with fresh flowers
Adherents of strict lines and symmetry will like the classic design of the extension in the European style. Its components are glass door, openwork lattice, many colors.

An extension created in the best European traditions
How to make a veranda for a wooden Finnish house? The design of the porch of a wooden house in the Scandinavian style provides for a symmetrical facade with a porch of a simple design (with a canopy and stairs). And when designing and finishing it, they try to preserve the texture of natural wood.

Neat extension in Finnish style
The porch of a wooden village house can be decorated in the Russian style. For this, logs and carved parts are used.

Russian style - types of porch of a wooden house, photo
How to build a porch and what design to choose
The main parameter by which the type and configuration of the extension is chosen is its combination with the mansion. Everything needs to be planned out at the design stage. To prevent the structure from sagging, it must be built on a strong and reliable foundation (according to all SNIP standards). A canopy is erected for protection from bad weather. Thus, the porch of a mansion is not only an important architectural element, but also a relaxation and comfort area.
Bottom line
The porch, like a business card of the house, can be of any configuration and size. The most important thing is that the structure protects the mansion from cold and bad weather, and also creates an overall harmonious architectural ensemble with it.
Living in a private house or relaxing in the country is an opportunity to be in the fresh air longer and enjoy the gifts of nature. Thoughtful furnishings in the house and in the surrounding area will ensure complete comfortable rest and accommodation. Our article is for those who have a private house and time to arrange it.
It's amazing how much you can do with your own hands, while saving money and spending time doing useful and enjoyable work. For example, you can make a porch at home yourself. After all, this is not only a beautiful addition, but also practical. The porch can be made of wood or concrete. In this article we will look at the basic steps of making a concrete porch with your own hands.
First you need to choose the shape of the future porch. It depends on the features of your home, the space available at the front door, and your personal preferences. The most aesthetic and practical is the semicircular porch. We will consider its construction below.
Material for making the porch:
- Cement grade 400
- Sand, preferably river sand (more resistant to moisture)
- Crushed stone of small or medium fraction
- External covering material
- Formwork or components for it
- Sizing and marking the territory
The size of the porch depends on your wishes. However, there are several factors to consider. Firstly, the porch should not be too small. After all, it is not beautiful and not convenient to use. Set the porch size to be proportional to the size of the house. It is worth considering the number of people who will use it regularly. If the family is large, then a porch “for one” will not be very convenient.
Marking begins with identifying the center of the circle. This should be a point exactly in the center of the line of the front door. How symmetrical the finished porch will be depends on the correct determination of the center of the circle. From the point you need to draw the radius of the circle. You can do this with a compass on paper, and only then transfer it to work surface in the right size.
If raising the front door allows, it will be possible to add several steps to the porch. To plan further actions, you need to measure the distance from the ground to the bottom of the door. Based on this, it will become clear to you how many steps, and therefore how many layers of the porch you will need to make. Of course, ideally, the steps should be the same for ease of use.
The standard step sizes are:
- Width from 27 to 32 cm;
- Height from 15 to 18 cm.
Preparing the base for the porch
Preparation of the foundation begins with removing excess soil and digging a pit with a depth of 30 cm. The pit is filled halfway with sand and compacted. We lay geotextiles, and the rest of the space must be filled with crushed stone to ground level. Now the base is ready for further work. More detailed information can be seen in the video.
Formwork formation and reinforcement
To make the formwork yourself, use sheets of wood or metal. But there is a more aesthetic method. This is the use of a stone that is preferably the same in shape and size. As a result, you will receive not only formwork, but also a beautiful porch frame, which is the beginning of the cladding. The stone must be placed along the edge of the marking using a level. Another advantage is that in this case there is no need to make supports, because the weight of the stones is more than enough. If you still make formwork from wood or metal, be sure to make supports. Take thin wood and wet it before use to ensure flexibility.
When the formwork is ready, you can begin reinforcement. To do this, use metal reinforcement or add fiberglass to the concrete.
Filling with concrete solution
For work, it is best to use cement grade 400. Having prepared a concrete solution from cement and crushed stone, pour the first layer of the porch. It must be filled quickly and completely - this will increase the strength of the structure. You can start pouring the next level after 4-5 days, when the first layer has dried. After filling all the layers, all that remains is to make the cladding. For this purpose, materials are used at your discretion and based on those available.
Now you have a guide to get started. More detailed information about the stages of work can be obtained by watching the video.
 Are there mites in Pitsunda? Ticks in Abkhazia. Pitsunda pine grove
 Red viburnum (Viburnum opulus L
 Nail Making Business How to Make Copper Nails
 Stone grill: material features and manufacturing options
 Blackroot medicinal cultivation
 Fuel cells: a glimpse into the future
 Houses with a hipped roof projects