Studring bicycle tires at home. Do-it-yourself tire studding. Do-it-yourself studded bicycle tires Do you need to stud both wheels?
Bicycle lovers often don’t get off their bikes even in winter. Anyone who has ever tried to drive on ice will appreciate the advantages of studded tires. Only the price for it bites. For a normal studded tire they ask from 1000 UAH. Here we reviewed the famous Nokian WXC-300.
What if you make it yourself? Why not. Let's make studded tires for a bicycle with our own hands.
We take a certain amount of banknotes and go to a bicycle shop. You can read reviews of some stores here.
We choose an inexpensive one so that you don’t feel sorry for throwing it away if something doesn’t work out as planned. But at the same time, it should be wide enough and have a large tread.
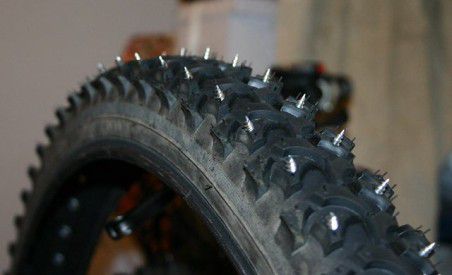
Then we go to a hardware store and buy self-tapping screws with a flat head. Their length depends on the tread depth of the tires. It is necessary that the end of the screw protrudes 1-2 millimeters. I chose the ones in the photo. I bought two sizes 10 and 12 mm. Which I didn’t regret later (I’ll tell you later).
In general, you need to measure the thickness of the tire before buying studs. How to do it? The easiest way is to pierce the tire with an awl at the future location of the spike and measure the awl. But I realized it after returning from the hardware store.
Next, we pierce holes with the same awl at the locations of the spikes. These places can be seen on branded spikes. It is better to do the puncture with outside, this allows you to clearly see where the tip of the spike will come out later. And screw in the screws. I repeat that they should protrude 1-2 mm from the tire.
Since I had two sizes of screws, I screwed the longer ones into the sides. Which I didn’t regret later. They help well when cornering. The main thing is not to touch the fork.
Thus, one tire requires about 100 studs (depending on how often you install them). This slightly increases the weight of the tire, but for budget option it's not scary.
 DIY studded bicycle tire
 Then you need to place a gasket inside the tire between the screw heads and the tube so that the heads do not rub against the tube. It can easily be cut from an old camera. But it is still better that the gasket is made of a harder material. For example, there is an idea to make it out of leather. Cut old shoes or boots)
Well, actually, you can put on studded tires and go test it out. I skated on this for two seasons. The flight is normal.
You can find many people who like to not only eat ice cream in winter, but also ride a bike, regardless of weather conditions. And some people try to reduce travel time in this way - after all, it’s easier to quickly get there on your two-wheeled vehicle than to splash around in the slush for a long time, getting your feet wet. If you are a fan of autumn and winter, then you have probably wondered how to make studded tires for a bicycle with your own hands. It's no secret that factory studded tires cost incredible amounts of money, and this applies even to Chinese-made tires. What can we say about branded models?
On the roads there are holes, ledges, and stones, which are much more difficult to notice in puddles and slush, under ice and snow. This means that in the autumn-winter period it is much easier to damage the tire. And if it is an expensive one that will have to be replaced again, the burden on your budget may become excessive. There is a way out - make bicycle spikes with your own hands. It's much easier than it sounds and is unlikely to take more than a couple of hours. At the same time, the cost of the necessary parts is minimal. So, let's stud your bike.
Items you will need
- Bicycle tire.
The tire itself, which we will stud. You can buy an inexpensive one, or you can take even a worn one that you were planning to throw away. It is quite suitable for practicing and understanding how to make cleats for a bicycle, and it is likely that it will last a long time, and if necessary, you can easily make another one. But if you are choosing a new tire, it is better to give preference to the one with a deeper tread. It is advisable that in those places where you will add spikes there is more thick layer rubber.

- Self-tapping screws with a wide head.
Self-tapping screws 4.2×13 mm are best suited. The fact is that part of the screw will go into the rubber, and another part will be erased while driving. Therefore, shorter screws may not last long, but if there is no other option, then you can take shorter ones. A wide head is needed for good fixation of the screw on the inside of the tire. In terms of quantity, you need as many screws as the number of studs you want to add to your bike.
- Super glue.
Any one you have on hand will do. Universal superglue will be sufficient. But if you choose glue specifically to make a studded tire for a bicycle, then you can use superglue for rubber.
- An awl or drill with a thin drill bit.
Of course, it will be much easier for you with a drill, but if you don’t have a drill, an ordinary awl will do.
- Phillips screwdriver suitable for self-tapping screws.
- Old bicycle tube.
Place all the items next to you, make sure there is good lighting, since you will have to find small holes in the tire, and get to work!
Instructions for creating studded tires

Next, we present detailed instructions how to make a studded one. Of course, first of all, the tire must be disassembled. After that, examine it and select the places where the spikes will be located. As mentioned above, it is better to choose places where the rubber is thicker, because the screws will hold it more firmly and there will be no tears. You can also make spikes on the side of the tire so that they point toward the ground at an angle. With them it will be more convenient for you to ride your bike, since the side studs will make it easier to take turns on icy roads.
It is best to make four rows of studs: two rows at the bottom of the tire and two rows on the sides.
Now let's get down to the process. Take a drill or awl and make a through hole in the tread where the first spike will be located. There is a little trick here that will greatly simplify the work.
Important! Pierce from the outside, not the inside. This way you will see exactly where the spike will come out and will not hit a thin section of rubber.
Then squeeze a drop of superglue onto the hole from the inside of the tire. Take a self-tapping screw and use a screwdriver to screw it into the hole until it stops. There is no need to overtighten so as not to create additional stress on the rubber. At the same time, the head of the screw must fit tightly enough to the tire for the superglue to fix it in place.

Important! Insert each screw immediately after the puncture. If you do all the punctures first and then start inserting screws, you will have a very difficult time finding the holes, especially if your tire is black on the inside.
Now you have a rather monotonous job of adding all the spikes. But it won't take too long. And when your tire turns out to be studded around the entire circumference, acquiring a rather futuristic look, you can rejoice at the results of your work: your own studded tires for a bicycle are ready!
There is only one final, but important detail left: you need to make a gasket so that the heads of the screws do not rub the inner tube of your bicycle. The easiest way to make such a gasket is from an old camera. But you can get creative and use scraps of leather or other material. If you don't have anything like this on hand, just cut the old inner tube lengthwise and wrap it around your bike's inner tube. You can lubricate it from the inside with superglue for better fixation. Put your new studded tires on top and go ahead and try them out!
Be prepared for the fact that at first a variety of debris, dry leaves and other objects that have fallen under will cling to the spikes. But over time, the screws will become a little dull and this problem will disappear. Good luck on the roads!
In this article we will talk about studded tires and self-studding bicycle tires at home. Let's compare the effectiveness of different studding methods with factory tires intended for winter driving.
Introduction
With the onset of winter, most cyclists stop riding and the bike can only wait for spring warming. And if the obstacle in the form of cold can be solved with warm cycling or casual clothing, then when snow and ice begins, riding becomes almost impossible. We will discuss this very “almost”.
This is not the first year that I have been haunted by the thought that it would be nice to take a ride on snow-covered paths, admire the winter landscapes and breathe in the clean frosty air. And the problem has always been the fear of a slippery road, which poses considerable danger. I was thinking about winter tires. But their cost always stopped me from investing from 700 to 1000 or more UAH. for several trips is extremely impractical for our modest incomes.
There were often links and pictures on the Internet and on the forum for making your own studs, but either you didn’t get around to it, or you didn’t have an extra pair of toothy tires at hand. Finally, the desire to ride on ice and snow exceeded all the “buts” and I decided to take up the issue of studding bicycle tires myself.
While searching for new information on the Internet and analyzing the attempts of my cycling brothers to make studded tires, I gradually formed an image of an ideal studded tire at home.
The most common mistake, in my opinion, is long spikes:


It seemed to me that the tire and tube could easily be damaged by the head of a broken screw. I decided that the thorns needed to be bitten off or ground off. Both of these options seemed extremely labor-intensive to me. Perhaps for this reason the process was constantly postponed.
But on the forum they suggested another option - instead of furniture screws (with a press washer), like these

use “flies” - the smallest self-tapping screws with a drill: 3.5 x 9.5. (bottom ones in the photo) The experience of others has shown that they are in no hurry to tear rubber, and they weigh less.
Choice
The screws were selected and, as a result of a short search, were found at Epicenter at a price of 60 UAH. for 1000 pieces. 500 was enough for me and the purchased screws were divided between two.
Now we choose tires. The main factor in the studding project was the minimum amount of cash investment, so that in case of failure, you would not regret the lost funds.
After asking around among members of the forum for unnecessary tires and places where you can buy inexpensive new ones, I came across a very attractive option: a pair of not too damaged (and the front one is almost new) Tioga Factory DH tires. The owner gladly and in the name of new research parted with them for a symbolic price of 40 UAH/piece. What's great about the tire: 2.3" tread width, large, thick lugs that are ideally placed for studs and are likely to be effective in the snow.

Process
Spike was carried out in the following way:
- First, use a screwdriver to drill holes in the tenons from the outside in. The diameter of the drill remained unknown, because... it was bought at the market from my grandfather “by eye” - something about 1 mm.
- From the inside of the tire you can see the holes through which the drill came out. We tighten the screws inside these holes. As it turned out, they are afraid that they will turn in the tires one more time; it is not worth it.
- We cut the old camera lengthwise from the inside, cut out the nipple
- We put the slightly inflated tube into the cut one and put it all into the tire and install it on the rim. Let's pump it up.
At first things went very badly. At first, there was no drill and we had to drill with the self-tapping screw from the outside, which caused our fingers to rub, and the screw constantly fell out of the non-magnetic head of the Phillips bit. The screws often came out off center of the tenon, which is why they had to be twisted. But from the first attempts, two rows were screwed into the rear tire: 104 screws, 52 for each row. It was decided, due to high labor costs, to leave two rows at the back.
The front wheel was studded with a drill and some skills. 208 screws (4 rows of 52 each) took a little over an hour. To celebrate, I decided to add the missing 2 rows to the rear tire. The result met all my expectations and confirmed the correctness of the choice of components - the studs stuck out of the rubber approximately as much as in expensive factory tires.


All close-up photos were taken after a test drive.
As I already wrote, another old camera was placed inside between the heads of the screws and the camera, cut lengthwise along the inner circumference. This is what the screw heads left on it after the test drive.

There are similar prints on the camera. The chamber is covered with talc, which was full of the cut tire.

If you pump it up, the prints are still visible. And although it’s too early to say that it’s easy to wipe even through the second chamber, I would advise sealing the caps with something denser and non-stretchy. Unfortunately, I have not found such materials and will continue to test the existing ones.
This is what the screw heads look like inside the tire.

Despite the fact that the screws sit tightly in the rubber and the tire does not plan to tear, I carry with me a spare tube and a tire, Kenda Small Black 8, which can roll up into a small ball.

The studs on the rear tire are different from the front ones. In this model, let me remind you: Tioga Factory DH, this was intended by the manufacturer (see photo of the tires above). I received the rear tire a little worn out and the inner row of studs sticks out 1-2 mm more. Not ideal, but I think it's better than without them.
The pressure in the chambers was lower than usual. It was checked only with fingers. It feels like about 1.5 ATM.
Test Drive
Three more people volunteered to check the quality of the work done with me in combat conditions. We gathered in Leporsky Park on Sunday morning to ride along its snowy paths, along the summer eliminator route.

Each of us four had studded tires. The following took part in the tests:
Tioga Factory DH with front sights 9.5 x 3.5

Schwalbe Ice Spiker

Innova 2.35 with thick furniture screws with sawed off points and additional “front sights”. He's been riding with studded tires for the 3rd year now. The rear is without spikes.

Kenda Klondike


We waited a little longer for new participants, no one was waiting and the test began!!!

But first, I’ll tell you how I got to the park and the gathering place, located one and a half kilometers from home.
I rolled the bike onto the landing. It clattered loudly with its iron spikes on the concrete. Carefully, trying not to hit the walls, I lowered the bicycle from the 3rd floor. I immediately noticed that the tires do not rest against the concrete at all, but slide along it. It is difficult to lean the bicycle against the wall - it may fall.
Street. Frost of 10-12 degrees, half-melted recent snow, which has turned into mush in places where people walk and cars drive and is frozen in this state. Small tubercles are cause for serious concern. If it weren't for the spikes, it would be very difficult to drive on them. But let's check the spikes... Lowered the saddle a couple of centimeters and off we went!
The first meters. Scary. I'm trying to check the grip of the tires. They don't seem to slip. Braking - they stop perfectly, they slide a little, but... Like on asphalt crushed by sand. Front braking is excellent! Quite effective, but the likelihood of blocking with subsequent skidding has increased. In general, I gradually went at full speed. Yes, you have to drive on sidewalks. It’s dangerous to get on the road because cars are much more stable than my bike :)
I pass frozen curbs, cross transverse deep snow and ice ruts. Everything is fine. The bike holds the surface as usual. Those. that's quite good. I try to ride while standing and rocking - no problems! I quickly get to the park, where they are already waiting for me.
Go! We rode around the park a lot. Not only does the bike hold steady on descents, but it also climbs hills without the slightest slip on the trampled snow. The kids sledding and not without difficulty climbing the slides along the slippery paths look with surprise as we drive up these slides. And even standing, even while rocking.
The photo shows how Lyokha enters the turn. With a slant, as usual. The studs perfectly allow you to control the bike in such conditions.

After driving around the park, we meet another participant in today’s trip. He does not have studs in his tires and feels much less confident. And only the experience of several trips before helps him not to fall every 10 meters.
We decide to test the braking. We find an area with a flat, smooth ice crust.

It's better to watch the results on video.
What happened: braking with only the rear wheel is ineffective and the braking distance is quite long. Without spikes it is almost impossible to brake (0:45). Braking with both wheels is very effective (0:33), but if you pinch the front, the rear wheel can lock and slip (1:13), which is highly likely to result in a fall.
After the park we went down to the sea. The steep descent along the steps opposite 50 Let Oktyabrya Boulevard provided a good thrill. Loose, melted snow does not hold the tires as securely as ice.
Two more were waiting for us below. Both are thornless. In response to my suggestion that they definitely go to the ice, one of them noticed that he had already checked in 4 times :) That is. fell.

And indeed, the guys did very poorly riding against a strong east wind. They drove slowly, fell, and were blown away by the wind.
The photo shows a stripe from my thorns. Yes, very much smooth ice It was scary to drive, but braking has not gone away, you can still drive while standing.


What is typical is that standing on this ice and even in the wind is very difficult, but riding a bicycle is incomparably easier. The tires hold ice simply amazing. Yes, I was embarrassed to allow myself to make banked turns and tried to drive as smoothly as possible without sudden movements. Therefore, I have not yet found the limit of the capabilities of tires with homemade studs.
As a result, the guys without spikes and Lech, whose back was left without spikes, gave up and climbed ashore, and we continued our journey across the ice. Soon we drove down to the Lyapin Hills area, rode along the ravine and returned to the city. Driving on a ravine with poorly compacted snow did not bring much pleasure and took a lot of energy. For some reason my knee hurt. Probably, several circumstances overlapped: increased loads, cold, low landing.


On the city streets, a frozen slurry of ice awaited us, trampled by people and rolled out by car wheels, turning into dangerous lumpy ice with ruts and small holes. Yes, often the wheel would fall off some bump, but it would immediately catch on with its spikes, and over time I got used to not being distracted by such trifles. I stopped noticing even shallow - up to 2 cm - longitudinal ruts from wheels on ice.
While the guys were going to the store, Denis called me and reminded me that we planned to take a photo of “his charm,” which became an intrigue for the whole week :) I returned back to Vostochny. A few dozen photos and home.

Winter riding
A few notes and observations on winter driving.
The temperature in the morning was 12 degrees and may have risen somewhat during the trip. I dressed noticeably warmer than 0 degrees, namely:
- two insulated cycling pants
- 3 pairs of socks, one of which is insulated, shoe covers, summer cycling shoes with contacts
- two pairs of gloves, one - cycling, the second - knitted
- "anti-aircraft gun", T-shirt with fleece sleeves, Nalini thermal jacket, bright windbreaker.
- on the head there are two ordinary Buffs, one of which is not original. Helmet. Glasses.
I felt very comfortable in all of this. Didn't freeze even in the wind. Except that at sea the little fingers on the hands could freeze, and on long stops - the toes. What is characteristic is that I did not sweat from overheating, although even in the park with many climbs I deliberately tried not to overheat. I wasn’t the only one who didn’t have a face mask, but sometimes, when riding against the wind, I wanted to put one on. I think that up to 10 degrees below zero it is not particularly needed and driving without it is a habit. On the other hand, while actively driving in the park on hills, I inhaled cold air several times, but there were no consequences.

Conclusion
It was a great ride. Traveled a total of 26.5 km. And guys under 50, because... We were coming from the center.
The tires turned out to be very good. The final budget was 110 UAH. (80 UAH tires, 30 UAH screws). All the efforts expended were not in vain and, moreover, exceeded all expectations. Together we decided that my tires are better than others on ice. A little behind was the Schwalbe Ice Spiker, whose spikes were smaller and not pointed, but with sharp edges on cylindrical protrusions. Artem with the Kenda Klondike did not have enough central studs, and Lekha should have studded the rear tire as well, so as not to have to walk up the climbs. It is very dangerous to ride without spikes, and especially for the first time.
We will try to repeat the trip next weekend. But this time we will have to deal more with the snow, of which there was quite a lot.
Cycling enthusiasts are often forced to buy expensive winter tires to ride in cold weather. One studded tire will cost incredible amounts of money, even if it is made in China, not to mention branded ones. It is much easier to make studded tires yourself and it will be much cheaper. However, you will have to spend a lot of time creating such rubber. Although in words, everything is quite simple.
For step-by-step instructions, watch this video
To work you need:
- old tire;
- self-tapping screws with a wide head;
- awl;
- glue moment;
- gloves;
- screwdriver;
- scissors;
- camera.


Self-tapping screws should not be very long, but must have wide heads. This will make the fastening more reliable.
First of all, we need to remove and disassemble the tire from the wheel. Now we take an awl and pierce holes in the places where we will insert the spikes. Please note that punctures should be made in thicker areas of the tire. Because in thinner ones, the rubber may come apart.
We pierce holes all over the wheel, the work is quite labor-intensive and dreary.
After all the holes are made, we proceed to further work.
Be sure to mark all the holes made on the inside, with chalk or a pen, the main thing is that you see them clearly in order to get into them.


Now take the glue and apply a drop at a time to each hole from the inside. Then we take a self-tapping screw and screw it into the hole with a screwdriver or screwdriver. Don't twist them too tightly.
There are about 350 studs per wheel, but you can make more or more. See at your own discretion. The work is quite long and tedious, so be patient in advance, screwing in the screws one by one. Don't forget to apply glue before screwing in the screw. This is important for keeping it securely in place.
Do not coat too many points at once, 4-5 will be enough. Otherwise, the glue will dry out and the adhesion of the screw head to the surface of the tire will not be good enough.

Advice: If your tire is dark on the inside, use transparent glue, this will allow you to see exactly where you made the hole and not make a mistake when screwing in the screw.
After all the screws are in place, take the camera and cut it lengthwise, along the seam. This is necessary in order to place it under the camera, which will help avoid friction on the spikes and rubbing it. We wrap the cut chamber around the inflated chamber. You can also glue it for security. We put studded tires on top and we can carry out tests.
So, it's winter... (although now, in the winter of 2006/07, sometimes it doesn't seem so). Every active (and not occasionally) cyclist who rides in winter will sooner or later be struck by the thought: shouldn’t he get hold of studded tires? And the more painful and unpleasant the reasons that gave rise to this thought, the sooner it will reign undivided in the cyclist’s head... Bicycle culture is slowly moving from the West to our dense steppes, and after it traders have followed, driven by a truth well known from school days - “demand creates supply” - in pursuit of our hard-earned banknotes. Nowadays it’s no longer a problem to buy factory studded tires in Kazan, unlike the winters of six or seven years ago – you just need to take the time to do so. In sports stores in Kazan you could even see some variety of studded tires: as many as 3-4 different models from 2-3 manufacturers. However, at the moment, there remains some incompleteness in the problem of providing everyone with studded bicycle tires...
Firstly, very little studded tires were imported. What was in stores was quickly sold out for the season - and some of those who wanted to buy these tires were unable to do so... Secondly, the choice of models is still rather small - they brought mainly budget models, with a small number of spikes, it seems to me, due to the insufficient development of the winter cycling subculture. And finally - about the despicable metal. The cost of a set of factory-made tires for both wheels could easily be on the order of the monthly salary of a university teacher or other government employees. C'est la vie...
So, studded tires are needed - but not everyone has them. Conclusion - let's do this ourselves. The method of studding tires presented here is not my invention; in addition, on the Internet you can find a number of descriptions of studding using both the presented method (using screws) and some others. However, it seems useful to describe the entire procedure in detail again, with sufficient illustrations to accompany the text.
1. The first problem to be solved is finding the right tire. Requirements for a potential victim of vivisection:
Hard tires, since when braking on ice, depending on the tread pattern, usually no more than 8-10 studs work - accordingly, the load will fall on 8-10 tread elements (hereinafter referred to as “buns”).
The “buns” themselves should be as large as possible so that there is enough rubber around the screw to hold it.
The tread pattern should satisfy your ideas about the optimal placement of studs.
To illustrate the studding process, the following tire (original appearance) was chosen when writing this text:
The tire was produced by an unnamed Chinese company, world-famous for its level of quality, which produces its products under the brand name “SUPERDIAMOND”:

The tread pattern of the purchased tire is as follows:

The following comments apply to it:
the “buns” are somewhat small and, as it will become clear later, the screws with a diameter of 4.2 mm, chosen for studding, will have a rather small rubber “side” holding them in case of careless tenoning;
The tread is asymmetrical relative to the plane of the tire, which can lead to “yaw” of the wheel when braking, however, a test drive is still ahead.
Only 108 “buns” are located relatively close to the axis of the tire in a “zigzag” pattern – and another 108 closer to the sides. They will probably only work in turns... So, there may not be enough studs.
2 . Next task - choice of screws. There are a lot of screws in local markets and stores, and it’s usually not difficult to find something suitable. Requirements for screws:
A cap that is flat on the outside (or at least without sharp edges) and has as large an area as possible (to better distribute the load on the camera).
The length, on the one hand, exceeds the thickness of the “buns” enough to stick out, and, on the other hand, not too long, since the excess will have to be cut off/bited off/ground off - an additional difficult operation.
Hardness – the studs should not wear off on the asphalt in one day. "Metal screws" will do.
In our case, the choice fell on “universal self-tapping screws with a press washer” size 4.2x20. The length is too big, but I didn’t want to look for others. I grabbed that I liked the first one. But the hats are a sight for sore eyes! They look like this:
It should be noted that there are similar screws that are only 11mm long, but they were not available where I got them. This would be a better option.
3. Let's start studding. For this we need an awl and a Phillips screwdriver. The process is obvious - we pierce a hole in the bun, if possible in the center:

If you prick from the tread side, it’s easier to aim and the holes are more accurately located. Then we screw a screw into the tire from the inside. To do this, you can turn it inside out a little. It turns out something like this:

"Wah-wah-wah! And so 216 times in a row." (With).
A little about how you can speed up this tedious process. It is clear that there is no escape from punching holes and tightening screws. But constantly turning the tire back and forth takes quite a lot of time. This can be avoided by immediately turning the tire inside out. At the same time, since the thickness of the rubber in different places differs significantly (where the “buns” are located it is noticeably thicker), then when turned inside out it looks heterogeneous. Where the “buns” are located on the back side, the back surface of the rubber has small concavities. The following picture illustrates this point:

The desired concavities are shown by arrows (although the photograph still shows it quite poorly - turn your tire inside out and you will see what we are talking about). With some practice, it is possible to pierce holes for screws directly from the inside, guided by these concavities. After some practice, you can prick quite accurately, and the tire does not need to be constantly turned back and forth, which saves time, and the sharp ends of the screws are directed inward, which reduces the likelihood of being scratched by them. However, those who wish can perform this operation with gloves. It will look like this:

After a certain time has passed, sufficient to tighten all the screws (in our case - 216 pcs.), the back side of the tire will look like this:

From the tread side, at this stage it resembles a gutted hedgehog turned inside out:

Let's turn the tire back to normal. The relationship with hedgehogs is becoming increasingly noticeable:

Side view:

Now it's time to put the studded tire on the wheel for the first time. Naturally, the camera must be protected from contact with the heads of the screws to avoid its rupture. To do this, it is easiest to use an old camera, cut lengthwise and with the nipple removed. As practice shows, for the front wheel, which bears a relatively small load, this is quite enough. for the rear, most likely, some more powerful protection may be required. There was a mention of the use of a highway tube cut along the highway for this purpose.
So, we take the old camera, which will work as a gasket:

Let's inflate the main chamber that is to be inflated a little - so that it holds its shape, but not so much that the wheel with it cannot then be beaded:

We put the camera gasket on the camera slightly inflated in this way:

Then, as usual, we put a studded tire on one side of the wheel rim, insert a “tube” sandwich, bead the tire completely and inflate the wheel. It turns out something like this:

Quite an evil hedgehog...
4. And here it comes - the second part of the Marlezon ballet. The screws must be shortened to the required length. The following options are possible:
The screws were taken quite short, and the protector, on the contrary, was thick enough - in this case there would be no need to bite off anything.
Too long ends can be ground off using an emery wheel. But not everyone has this item in their household; it is also noisy and dusty. But the option is quite working...
Finally, the ends of the screws can simply be bitten off with simple hand tools - all kinds of wire cutters, pliers, etc.
For example, here is a photo of a tire with short screws that did not bite at all:

Now let's assume that biting the ends is still necessary (as in our case). Let's talk about the tool. It is quite clear that the tool can be different, as, indeed, the screws too. The simplest option, available in every home and promising hard work, is ordinary pliers or wire cutters with one axis. The mechanical gain in strength is small, so they can only bite through thin screws (or only the ends of thicker ones). The screws should be relatively soft - otherwise the wire cutters will quickly deteriorate - and they will be of little use. A more convenient option is pliers with additional levers (in the picture below; above, for comparison, ordinary pliers):

These types of cutters are less common in stores, but I managed to find them from a fellow motorist. Since in the case under consideration the screws are thick and hard, even such powerful nippers were not particularly sufficient. The screws should be bitten so that the ends remain about 1.5-2.5 mm long. However, it seems that special precision is not needed here. As a result, I still managed to bite off all 216 screws - but after 5 evenings, that is, after an average of 40 screws, I was pretty tired of this task, and my fingers were no longer able to press the handles of the nippers any longer. When working, it is useful to use safety glasses (I wore the usual ones that I wear when riding a bicycle) - since the bitten ends of the screws tend to energetically fly apart in all directions. Gloves won't hurt either - the screws are now sticking out. As a result, we have the desired studded tire. 216 spikes arranged in two “curved” rows. It still doesn't fit into a four-row car.
Project costs:
Tire – 160 rub.
Screws – 216pcs x 35kop – 76r.
The inner tube is made in Russia (the rubber is thicker and costs less) – 60 rubles.
Total 296 rub. Whether it is worth getting involved with this option is something everyone decides for themselves. Possible alternatives are either driving without studs (which can be a bit rough), or buying factory-made tires (which may be impossible either for financial reasons or simply due to the lack of such rubber in stores).
Top view of the finished product:

 Are there mites in Pitsunda? Ticks in Abkhazia. Pitsunda pine grove
 Red viburnum (Viburnum opulus L
 Nail Making Business How to Make Copper Nails
 Stone brazier: material features and manufacturing options
 Blackroot medicinal cultivation
 Fuel cells: a glimpse into the future
 Houses with a hipped roof projects